Web Development (Flask)
Blog Post: Web Development
In this blog post, I’ll create a simple webapp using Flask and describe how I did it. The skills I’ll need are:
Flask fundamentals, including render_template(), the basic anatomy of templates, and user interactions. Database skills, including adding items to databases and displaying them. Basic CSS in order to add a bit of personal flare to my webapp.
Overview
The app I’m going to build is a simple message bank. It could do two things:
- Allow the user to submit messages to the bank.
- Allow the user to view a sample of the messages currently stored in the bank. Additionally, I will use CSS to make my app look attractive and interesting!
The code for my app is hosted in a GitHub repository. The link will add at the end of this post.
Enable Submissions:
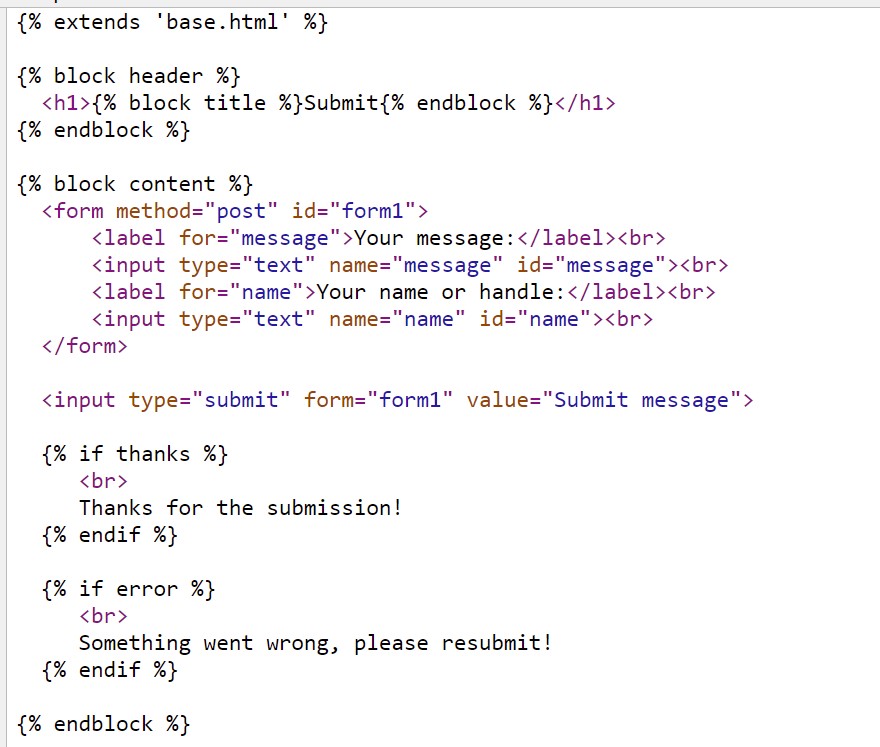
First, I am creating a submit template with three user interface elements:
- A text box for submitting a message.
- A text box for submitting the name of the user.
- A “submit” button.
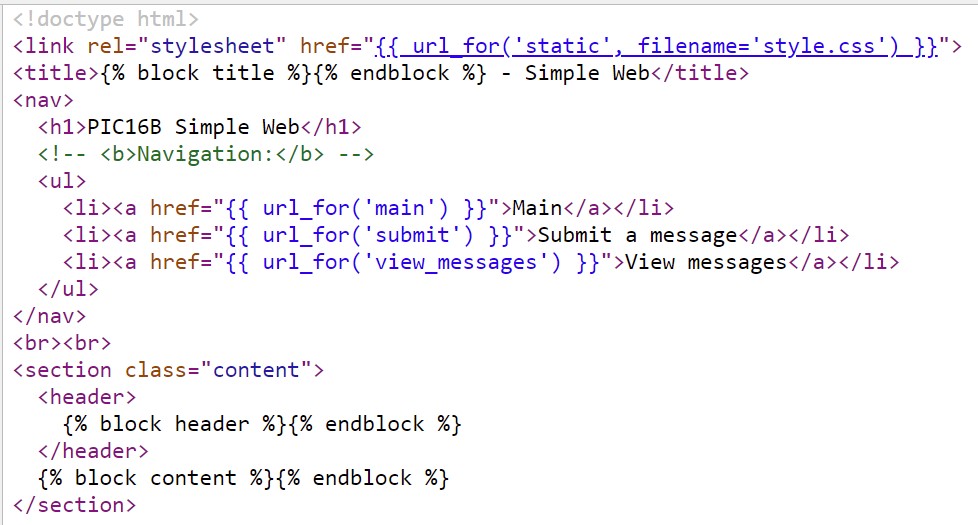
I will also put navigation links (the top two links at the top of the screen) inside a template called base.html, then have the submit.html template extend base.html.
below is the html script for submit.html. check all html files

the Python functions for database management in a the app.py:
- main: the main page will display when we first open the page
- submit: web page for sumbit messages and handles, it will calls insert_message() from web_helper and insert all the inputs into the database
- view_messages: web page that calls random_messages() from web_helper and ask user how many messages he/she want to display, then random display that number of messages into the page. It will gives notice if we dont have enough messages.

the help functions in web_helper:
- get_message_db
- Check whether there is a database called message_db in the g attribute of the app. If not, then connect to that database, ensuring that the connection is an attribute of g.
- Check whether a table called messages exists in message_db, and create it if not. For this purpose, the SQL command CREATE TABLE IF NOT EXISTS is helpful. Give the table an id column (integer), a handle column (text), and a message column (text).
- Return the connection g.message_db. database
- insert_message
this function inserting a user message into the database of messages.
- open a connection to a database by using get_message_db
- get strings from input request
- insert strings into database as a new row
- run db.commit() to ensure that your row insertion has been saved.
- close the database connection within the function!
import sqlite3
from flask import g, request

# this function will creating the database of messages.
# It first check whether there is a database called message_db
# in the g attribute of the app. If not, then connect to that
# database then check whether a table called messages exists
# in message_db, and create it if not.
def get_message_db():
    # write some helpful comments here
    try:
        return g.message_db
    except:
        g.message_db = sqlite3.connect("messages_db.sqlite")
        cmd = """
            CREATE TABLE IF NOT EXISTS message_table(
            id INTEGER,
            handle TEXT,
            message TEXT
            )
            """
        cursor = g.message_db.cursor()
        cursor.execute(cmd)
    return g.message_db


# this function could inserting a user message into the database of messages.
def insert_message(request):
    name = request.form["name"]
    message = request.form["message"]

    # open a connection to messages.db
    connection_obj = get_message_db() # call get_message_db function
    cursor_obj = connection_obj.cursor()


    id_cmd = "SELECT COUNT(*) FROM message_table"
    cursor_obj.execute(id_cmd)

    # get total number of rows then add 1 to get unique new id
    id = cursor_obj.fetchone()[0] + 1

    insert_cmd = """
        INSERT INTO message_table
        (id, handle, message)
        VALUES
        (?, ?, ?)
        """
    data = (id, name, message)
    cursor_obj.execute(insert_cmd, data) # inser data as new row

    connection_obj.commit() # save changes
    connection_obj.close() # close connection


# this function will return a collection of n random messages from the message_db
# n argument is request.form["number"] which is a html script in string form
def random_messages(n):
    # open a connection to messages.db
    connection_obj = get_message_db() # call get_message_db function
    cursor_obj = connection_obj.cursor()

    length_cmd = "SELECT COUNT(*) FROM message_table"
    cursor_obj.execute(length_cmd)
    num_len = cursor_obj.fetchone()[0]

    out = ""

    if (int(n) > num_len):
        out = ("The number " + n + " you input is exceed the maximun number of messages(" +
            str(num_len) +
            "), I can only show below messages:<br><br>")
        n = str(num_len)

    cmd = "SELECT * FROM message_table ORDER BY RANDOM() LIMIT " + n

    # updateing out, out is a string that contains html script
    for row in cursor_obj.execute(cmd): # row is a tuple
        out = out + row[2] + "<br>" + "- " + row[1] + "<br><br>"

    connection_obj.close() # close connection

    return out # a html script in string form
- render_template
this function are used to load html templates and insert into the base.html. I added comment for each render_template in bleow code:
# import modules
from flask import Flask, render_template, request
from flask import redirect, url_for, abort, g
import io
import web_helper

app = Flask(__name__)

@app.route('/') # the default page or the mian page
def main():
    return render_template('main.html') # load main.html in template file


@app.route('/submit/', methods=['POST', 'GET']) # the sumbit page to sumbit messages
def submit():
    if request.method == 'GET':
        return render_template('submit.html') # load submit.html in template file
    else:
        # if the user submits the form
        try:
            web_helper.insert_message(request) # call insert_message function
            return render_template('submit.html', thanks=True)
        except:
            return render_template('submit.html', error=True)


@app.route('/view_messages/', methods=['POST', 'GET']) # the view_message page to view messages
def view_messages():
    if request.method == 'GET':
        return render_template('view_messages.html') # load view_messages.html in template file
    else:
        try:
            out = web_helper.random_messages(request.form["number"]) # call random_messages function
            # out is a format html script in string form
            return render_template('view_messages.html', output = out)
        except:
            return render_template('view_messages.html', error = True)
example:


Viewing Random Submissions
In the web_helper.py(inside the code I posted above), we also defined random_messages function:
- random_messages
this function takes a ‘web request’s attribute’(the number that a user input) as input to random output messages from table.
- check if input valid
- use “SELECT * FROM message_table ORDER BY RANDOM() LIMIT “ + input to random select messages
- append all mesages into a html script and wraps it as a string
- close the database connection within the function!
- return the string
example:

HTML Template
In this project, most content displayed on the web is written in HTML files. The HTML content is displayed below. We can see if we manually type everything of the HTML file, it’s actually a little pain so we usually use HTML templates to build the frame and then fill it with the text we want.
- base.html: The base.html has the navigation elements which are put within li(stands for list) tags, and the is controlled by the python code. When we first open the web, it navigates us into the main.html(which is embedded in the base.html), what happens on the server-side, it loads the base.html first and runs the python code to embed the mian.html in, then displays the web.
- submit.html: In general, if a user clicks the submit text on the navigation part. will be execute and repacing the previously embedded HTML.page by submit.htm. In the base.html, we have the {\% block header \%}{\% endblock \%}, and the {\% block content \%}{\% endblock \%} are used for HTML place holder. We can also find there are the same holders in sumbit.html. Above these holders, there is a {\% extends ‘base.html’ \%} tells computer submit.html extends the base.html. After embedding, what we wrote in {\% block header \%}{\% endblock \%}, and the {\% block content \%}{\% endblock \%} in submit.html will be displayed in the corresponding holders in base.html.
base.html

submit.html

3. Customize the App
Though this app used a lot of python codes, our goal is to use python code to create HTML scripts, and HTML scripts can be customized by using CSS styling. Without the style.css file, our web will look very boring:
 I put the style.css file and two background images inside the static folder. Check the comments in style.css for details.
html {
    /* change text font */
    font-family: sans-serif;
    padding: 1rem;

    /* set image as background */
    background: url("background_html.jpg");

    /* Full height */
    height: 100%;

    /* Center and scale the image nicely */
    background-position: center;
    background-repeat: no-repeat;
    background-size: cover;
}

body {
    max-width: 900px;
    margin: 0 auto;
}

h1 {
    color: rgb(0, 0, 0);
    font-family: cursive;
    margin: 1rem 0;
    text-align: center;
}

a {
    color: rgb(28, 88, 229);
    font-family: cursive;
    text-decoration: none;
    font-weight: bold;
    font-size: 1.3rem; /* 1.3 times bigger than default size */
}

hr {
    border: none;
    border-top: 1px solid lightgray; /* set border */
}

nav {
    background: antiquewhite;
    padding: 0 0.5rem;
    border-radius: 25px;
}

nav ul  {
    display: flex;
    list-style: none;
    margin: 0;
    padding: 0;
}

nav ul li a {
    display: block;
    padding: 0.5rem;
}

.content {
    padding: 1rem 1rem 1rem;
    border-radius: 25px;

    /* set image as background */
    background: url("background.jpg");

    /* Full height */
    height: 100%;

    /* Center and scale the image nicely */
    background-position: center;
    background-repeat: no-repeat;
    background-size: cover;
}

.flash {
    text-align: center;
    margin: 1em 0;
    padding: 1em;
    background: #cae6f6;
    border: 1px solid #377ba8;
}
Thanks for reading, click https://github.com/hcheng10/Web-Development for all the code, and https://pic16-simple-web.herokuapp.com/ for the actual website.